This week I learnt about CSS (Cascading Style Sheets), which is the presentation layer of a webpage. The term “cascading” means that CSS applies styles by following an order of priority, usually taking the last line of code applied to an element. By learning CSS, I now have a clearer understanding of how to use it to style and enhance webpages.
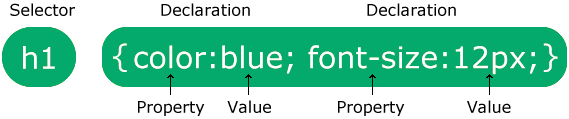
To use CSS, you start with a selector, which is the element you want to design. Inside curly brackets, you then add properties and values that define how the element should look. For example, color: blue; sets the text colour to blue. By experimenting with CSS on my three designed objects, I was able to change text and background colours and even add cool effects like image shadows. This showed me how CSS really brings a webpage together, making it more visually appealing.
We also looked at the work of Lynn Fisher, a very inspirational web designer. She thinks outside the box when applying CSS, which makes me want to have fun and be more creative with my own designs. While exploring, I also came across CSS Tricks, a website full of helpful examples and explanations. I’d recommend it to anyone, whether they’re just starting with CSS or already experienced.
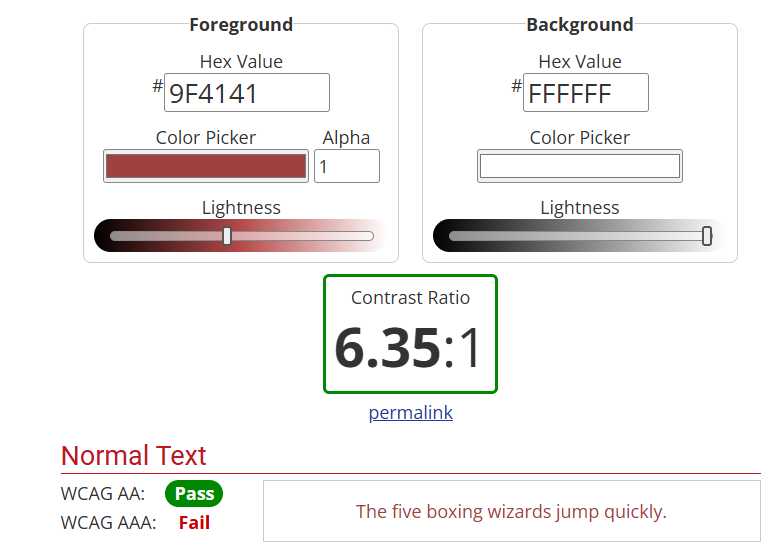
When working with colour, I wanted to make sure my text was always easy to read against the background. I found a contrast checker website that tested whether my colour choices passed accessibility standards. It was simple to use, and I could instantly see the difference in how much clearer my text looked.
Finally, I improved the homepage of my website. At first, it looked a bit dull with just plain text links, so I added images of my three objects and linked them. This was something I hadn’t done before, but it was straightforward and it made my homepage far more attractive and engaging.
Overall, this week gave me a solid foundation in CSS, as well as the confidence to experiment with styling and design. I enjoyed seeing how small changes could make a big difference in the look and feel of my work, and I’m looking forward to building on these skills in the weeks ahead.
References:
- https://webaim.org/resources/contrastchecker/
- https://fonts.google.com/
- Adding links to images